Posts

Showing posts from 2020

Instagram - How to unfollow someone's posts without actually unfollowing their account

Image
Instagram now provides a feature where in you can unfollow/ignore someone's posts and activity without actually unfollowing the account. Instagram will not notify the person about this. This is a fantastic feature of instagram which can help avoid unwanted content from an account without needing to unfollow the account. You can do this by following method: Login to instagram on your browser or mobile app. Navigate to the profile you wish to ignore. Click on the three dots (3 horizontal dots if you are on desktop browser and 3 vertical dots if you are on mobile app) at the top right corner. Now click on "Restrict" from the dropdown list. Now click on "Restrict Account". Now you will no longer see any posts, messages or comments from the restricted account. Any comments left by the restricted account on your posts will remain hidden until you specifically approve the comment. Image sources: Instagram.co

XDebug - PHPStorm - Mac: How to configure Xdebug with PHPStorm on Mac OS and PHP 7.3

Image
For this illustration we are using PHP7.3 Find the path of your PHP ini files by opening the console and running following command: php --ini In your root folder create a new file using following command and generate Phpinfo file: sudo vi phpinfo.php Now in your browser run: http://localhost/phpinfo.php . Copy the entire output from this page and paste it into https://xdebug.org/wizard This will give you the download link to xdebug. Now open your console and run below commands: Check the path against "Scan the additional .ini files in". In most cases the path would look something like "/usr/local/etc/php/7.3/conf.d" sudo vi /usr/local/etc/php/7.3/conf.d/ext-xdebug.ini Now in your PHPStorm perform below steps: Click on PHPStorm > Preferences > Languages & Frameworks > PHP > Debug Under Xdebug > Change "Debug Port" to "9001" and select "Can accept external connections Click on Apply Yo

MongoDB - PHP7.3: How to install MongoDB with PHP 7.3.x on a Mac Catalina 10.15.x OS with Homebrew

The usual command to install mongoDB which is as below: pecl install mongodb However, this will fail on MAC Catalina OS with PHP 7.3.x with following error: In file included from /usr/local/Cellar/php@7.3/7.3.23/include/php/Zend/zend.h:335: /usr/local/Cellar/php@7.3/7.3.23/include/php/Zend/zend_operators.h:486:10: error: 'asm goto' constructs are not supported yet __asm__ goto( In order to fix this error, you will need to do below: Optional steps: In case you do not have homebrew installed you can install it with this command: $ /bin/bash -c "$(curl -fsSL https://raw.githubusercontent.com/Homebrew/install/master/install.sh)" In case you still face issues with mongoDB installation then perform below and try the pecl install mongodb command again -- Download XCode 12 beta CLI tools and XCode 12 beta from https://developer.apple.com/xcode/resources/

Magento 2: How to fix Temando Error logs

If you are not using Temando Shipping module which comes packaged with Out of the Box Magento in your E-commerce site then most likely you will see your var/log/system.log file being spammed with numerous errors that look like below: [2020-09-02 11:13:03] temando.CRITICAL: "accountId" is required. Enter and try again. { "exception":"[object] (Magento\\Framework\\Exception InputException(code: 0): \"accountId\" is required. Enter and try again at /vendor/magento/framework/Exception/InputException.php:91)" } This error is a Core magento bug. It may seem minor, but over a period of time if ignored, it can result in a humungous system log file size and as a result your actual logs and important messages can get lost between these errors. In order to fix this error there are 2 ways: 1) Disable the Temando_Shipping module in your magento site using this command: php bin/magento module:disable Temando_Shipping OR 2) Create a d

Magento 2: How to place order as a guest customer using Magento 2 REST API

In order to place a new order as a guest customer using REST APIs in Magento 2, please follow below steps: MAGENTO 2 REST APIs: CREATE GUEST CART: NOTE: Quote/Cart ID here is received from Step 1 of creating guest cart. ADD ITEMS TO GUEST CART: GET TOTALS OF GUEST CART: ESTIMATE SHIPPING OF GUEST CART: SET BILLING AND SHIPPING DETAILS OF GUEST CART: PLACE ORDER FROM GUEST CART:

Magento 2: How to login as Customer and place new order via REST APIs

In order to place a new order as a logged in customer using REST APIs in Magento 2, please follow below steps: You can Download the Postman Tool from here: www.postman.com Now, Open Post man and create below Requests: MAGENTO 2 REST APIs: CUSTOMER LOGIN: CREATING CUSTOMER QUOTE: ADD ITEMS TO CART COLLECT CART TOTALS GET AVAILABLE SHIPPING METHODS & ESTIMATING SHIPPING CHARGES SET BILLING AND SHIPPING ADDRESS OF ORDER PLACE ORDER Now check your admin panel and there will be a new COD order placed.

Magento 2: How to create new indexer for your custom module

For this tutorial we will consider an example of a custom module called Vendor_ModuleName. Create below files to generate a new VSBridge indexer and Elastic Index for your own module: Vendor_ModuleName\etc\indexer.xml Vendor_ModuleName\etc\mview.xml Vendor\ModuleName\Model\Indexer\CustomIndexer.php Now, open console and run below command: You will now see following: A new indexer job for your module in Magento admin panel > System > Tools > Index Management A new index in elastic You can refresh your indexer with php bin/magento indexer:reindex my_custom_indexer

Magento 2 - Vue Storefront PWA Integration: How to create a new VSBridge indexer job and Elastic Index for your custom module

For this tutorial we will consider an example of a custom module called Vendor_ModuleName . You need to have the module divante/magento2-vsbridge-indexer installed and configured in your project, in order for it to work with your Vue StoreFront PWA website. You can do this with below command: Once you have the module installed and configured correctly, create below files to generate a new VSBridge indexer and Elastic Index for your own module: Vendor_ModuleName\etc\indexer.xml Vendor_ModuleName\etc\mview.xml Vendor_ModuleName\etc\vsbridge_indices.xml Vendor\ModuleName\Model\Indexer\CustomIndexer.php Vendor\ModuleName\Model\Indexer\Mapping\CustomIndexer.php Vendor\ModuleName\etc\di.xml Now, open console and run below command: You will now see following: A new indexer job for your module in Magento admin panel > System > Tools > Index Management A new index in elastic You can refresh your indexer with php bin/magento indexer:reindex vsbr

Magento 2: How to create new import entity

If you want to add a custom import feature in your Magento 2 site, you can do this by following steps. This will add a new entity in ADMIN PANEL > SYSTEM > DATA TRANSFER > IMPORT Vendor\Module\etc\import.xml Vendor\Module\Model\Import.php Vendor\Module\Files\Sample\mycustomimport.csv Now, Open your console and run below command: Navigate to ADMIN PANEL > SYSTEM > DATA TRANSFER > IMPORT > IMPORT SETTINGS > Click on the dropdown >. Your custom import entity will appear here.

Magento 2: How to automatically generate Postman Schema for Default Magento 2 APIs

In order to automatically generate the Postman Schema for all of the Default Magento 2 APIs, follow below steps: Open your console, and trigger following CURL requests. This will generate a JSON file in your root directory. Now, Open Postman app > File > Import > Select the JSON file generated above and Voila, you now have the Schema of all Magento 2 APIs.

Magento2: How to stop a product from getting added to cart programmatically?

If youn want to stop a product from getting addded to cart programmatically, add below files to your module: Vendor_Module\etc\di.xml Vendor_Module\Model\Checkout\Cart\AddProduct.php

Magento2: How to add new grid in Category Listing Page

Here is a tutorial on how to add new Grid in Category Listing Page. For this example we will assume we want to add a grid same as Product Category Positions for Category Brands. It should look something like below: Assume that you have a custom module called Namespace_Module. You will create following files in your module: Namespace_Module\view\adminhtml\ui_component\category_form.xml Namespace_Module\Block\Adminhtml\Category\MyCustomGrid.php Namespace_Module\view\adminhtml\templates\catalog\category\edit\assign.phtml Namespace_Module\view\adminhtml\web\catalog\category\edit\assign.js Namespace_Module\Controller\Adminhtml\Category\Assign.php Namespace_Module\Block\Adminhtml\Category\Tab\MyCustomGrid.php For saving, updating and deleting the positions you need to create plugin on category save which takes the posted json, compares with original json and performs the required operation.

Magento 2: How to create your own Patch File and apply it through composer

Magento releases new patches for it's framework from time to time. Here is a tutorial of how to create your own patch file in Magento. Although I personally am not a huge fan of patches, due to various drawbacks, there are desperate times when you need to apply a patch. I would suggest to use this approach as less as possible and instead opt going the standard magento way of versioned modules that store your changes. But, In case there are times when you are forced to create a patch, or just for self-knowledge on how it's done, you can follow below tutorial. STEP 1: In your magento root directory create a folder called "patches". STEP 2: Create a sub-directory with the name Namespace_Module for the module which you want to create a patch for. So the path will look like this: < >\patches\Namespace_Module STEP 3: Add your patch file in the directory you created in Step 2 of this tutorial. HOW TO CREATE A PATCH FILE: Create a backup of the ori

Magento 2: Add new button on Category Edit Page in Admin Panel

For this example we will assume you have a custom module. Let's call it Namespace_Module. Now, create files as below: Namespace_Module\view\adminhtml\ui_component\category_form.xml Namespace_Module\Block\Adminhtml\Category\Edit\Button\AssignButton.php Namespace_Module\Controller\Adminhtml\Category\Assign.php Voila !! That's it. Now, clear all caches and check the category page in admin panel. There will be a new button called "Assign".

5 Things IT Start-ups SHOULD do

There are a lot of blog-posts all over the internet with the list of points which startups should not do. However, from my experience of working as an advisor to so many startups, i can figure out that, what they actually need is a list of "TO-DOs". Because most of the time, believe me, start-ups have absolutely no idea as to what to do and where to start from. If you too are facing the same dilemm, you are in the right place. I am here to help you get started. Sometimes, not having the correct tools, or missing the basics can prove to be a very expensive mistake. It could be in the form of potential clients rejecting the quotations and good candidates rejecting your job-offers. Following 5 points will not only help you get the correct personnel but also a good client-base to start with. RESEARCH: Research your competitors in the same domain. It's hard to be impartial, but try to look at their wo

Magento 2: How to add custom discount in cart programmatically?

Refer to how Magento2 applies sales-rule discounts. I applied similar approach to apply custom discount, by creating following files in my module: Namespace_Module\etc\sales.xml Namespace_Module\Model\Quote\Discount.php Namespace_Module\view\frontend\layout\checkout_cart_index.xml Namespace_Module\view\frontend\layout\checkout_index_index.xml If Fetch is not showing the custom discount description, it was a core magento bug, see this ticket for patch details: https://github.com/magento/magento2/issues/3594

MAGENTO 2: How to get HTTP Request Params

Also Check my blogpost here on getting API Request params: http://parekhreena.blogspot.com/2020/08/magento-get-rest-api-request-params.html

MAGENTO 2: Get REST API Request Params

MAGENTO: How to add a button in store configuration

For this illustration, we will add a button in store configuration called "Assign Button". When this button is clicked it will call a controller and perform the necessary function. We will first need to have a custom module where we can manage all this code. For this example we will use Namespace_Module . This will add button in store configuration.

MAGENTO 2-PWA KUBERNETES: How to put your elastic search behind username and password

For this illustration I am using Magernto, Vue Store Front PWA, Elastic Search and Kubernetes. First goto console and type This will ask you to enter the password. Enter the password which you wish to set for elastic authentication. After this is done run below command: Copy the contents of the file. Now, In your nginx.yaml file add the following:

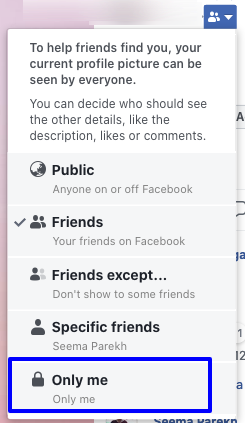
How to lock your profile picture on Facebook so no one can like or comment, just view.

Image
You can lock your Facebook profile picture so that it can only be viewed and no one can like, comment or download it. Here are the steps to achieve this: Login to your Facebook account Goto your profile page. You can do this in following ways depending on your platform: For Desktop Facebook: By clicking on your name on the top right if you are on Desktop. For Mobile Facebook: By clicking on three horizontal lines on the top right and then clicking on your name if you are on Mobile App of Facebook. Now, Click on your profile picture. It will open in a picture viewer of Facebook. On the right side below your name, near the date, there will be a symbol (by default the globe symbol). Click on this globe symbol, a drop-down of "Who should see this ?" will appear. From this d